Make sure you read Chapter 4.
Today we start writing code that modifies digital images. You will experiment with effects many of you have already used in programs like Photoshop.
We will work with pictures that are represented on a computer as two-dimensional arrays of pixels. A two-dimensional array is also called a matrix. Each cell in a matrix can be referenced using its row and its column. For example, consider the following matrix:
| 12 | 17 | 1 | 2 |
| 22 | 4 | 9 | 81 |
| 5 | 42 | 51 | 34 |
Arrays are typically 0-based (i.e., indexing starts with 0). Thus, to access the value 42, you would use coordinates (1,2) - i.e., second column (index = 1) and third row (index=2).
JES provides a method to access any pixel. The following code will return a Pixel object and store it in variable myPixel.
>>> myPixel = getPixel(myPicture, x, y)
(where myPicture is the picture object you created with makePicture(), and x and y are the coordinates of the requested pixel).
A Pixel object gives us access to the color stored in that pixel. Color is encoded using the RGB model: integer values 0-255 for red, green and blue. We can access these values or modify them. For example, the following code reduces the red value of a pixel by 50%:
>>> redValue = getRed(myPixel)
>>> setRed(myPixel, redValue * 0.5)
In most cases, we will be accessing all the pixels, or a subset of all the pixels of a picture, and then modifying their color. That's essentially, how most image effects work - including the fascinating effects done in Photoshop! How complicated can that be? Well, the trick is to know what pixels to modify and what combination or red green and blue to use (an 800 x 600 pixel image has 480,000 pixels, and each can be set to one of 256x256x256=16,777,216 values - which gives you "quite a few" possible combinations).
Of course we can access a single pixel using its X and Y coordinates. However, a much useful approach is to get all the pixels and then use a loop to modify them all, one pixel at a time. Your textbook describes in detail what happens in a loop, and how to trace its execution - read that part carefully and try to follow the examples.
Let's try running some code.
def makeSunset(picture):
  for p in getPixels(pic):
    blueValue = getBlue(p)
    setBlue(p, blueValue * 0.6)
    greenValue = getGreen(p)
    setGreen(p, greenValue * 0.6)
  repaint(picture)

We can improve this function.
Step 1. Consider what our function does. It doesn't *really* create a sunset effect - it reduces the amount of blue AND it reduces the amount of green ina pixel. Whenever you have to use the word AND to describe what a function does, that is a strong indication that your function is doing too much. A good function has one purpose, it does one thing (and does it well). That makes a function more general and reusable. We may want to reduce the amount of blue (or green) in other scenarios, but the makeSunset function gives us only the option to reduce them together. So let's rewrite our function:
def makeSunset(picture):
  reduceBlue(picture)
  reduceGreen(picture)
  repaint(picture)

def reduceBlue(picture):
  for p in getPixels(picture):
    blueValue = getBlue(p)
    setBlue(p, blueValue * 0.6)

def reduceGreen(picture):
  for p in getPixels(picture):
    greenValue = getGreen(p)
    setGreen(p, greenValue * 0.6)
Now we have three functions instead of one - where's the improvement, you might ask? The improvement is that now we have 2 functions we can reuse in other contexts: reduceBlue() and reduceGreen(). Every time we need to reduce the amount of blue or green we will simply call these functions - and not rewrite the same functionality over and over again.
Step 2. But can we do better? Are we sure we want to reduce these values by 0.6 in all cases? Let's try to factor out that value:
def makeSunset(picture):
  k = 0.6
  reduceBlue(picture, k)
  reduceGreen(picture, k)
  repaint(picture)

def reduceBlue(picture, reduceBy):
  for p in getPixels(picture):
    blueValue = getBlue(p)
    setBlue(p, blueValue * reduceBy)

def reduceGreen(picture, reduceBy):
  for p in getPixels(picture):
    greenValue = getGreen(p)
    setGreen(p, greenValue * reduceBy)
Now we have three functions, and each of them does only one thing: - makeSunset() creates a sunset effect by calling two other functions and passing the value of 0.6 (which it "knows" to be a good value for a sunset effect) - reduceBlue() reduces the amount of blue in all pixels by a specified amount in a given picture - reduceGreen() does the same to the amount of green.
Both reduceBlue() and reduceGreen() can be used in any other context: they are not "tied" in any way to the concept of a sunset or to any specific value b which the color is reduced.
Pay special attention to section 4.4 of the textbook which gives more details on functions and function decomposition.
Let's try some more effects.
The following code will create a negative. The algorithm is really simple: subtracting the current value of red/green/blue from 255 gives you the "opposite" (with black=0 being the opposite of white=255).
def makeNegative(pic):
  for p in getPixels(pic):
    red = getRed(p)
    green = getGreen(p)
    blue = getBlue(p)
    negColor = makeColor(255-red, 255-green, 255-blue)
    setColor(p, negColor)
  repaint(pic)
Calling this function on the negative will produce the original picture - we haven't lost any data!
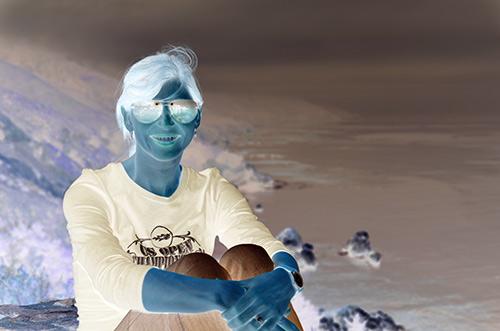
Another interesting effect we can easily create is to convert a color image into a grayscale. In this case, we simply compute the average of the red, green, and blue and use that as the new color:
def makeGrayscale(pic):
  for p in getPixels(pic):
    red = getRed(p)
    green = getGreen(p)
    blue = getBlue(p)
    intensity= (red + green + blue) / 3
    color = makeColor(intensity, intensity, intensity)
    setColor(p, color)
  repaint(pic)
This gives us the luminance of the color (its intensity). However, as you recall from your readings, we perceive blue to be darker than red, so we can take a weighted average of the values of red, green and blue, which will give us a more natural grayscale.
def makeBetterGrayscale(pic):
  for p in getPixels(pic):
    red = getRed(p) * 0.299
    green = getGreen(p) * 0.587
    blue = getBlue(p) * 0.114
    intensity = red + green + blue
    color = makeColor(intensity, intensity, intensity)
    setColor(p, color)
  repaint(pic)
The difference is subtle, but you still may see the difference:


 original -- grayscale() -- betterGrayscale()